Monday, 17 September 2012

31 Day Challenge: Day 17- Glitter Nails

Yippee! I LOVE glitter nails, and when I saw that there was a glitter day to the challenge, I knew straight away which sparkler I wanted to feature! Behold...


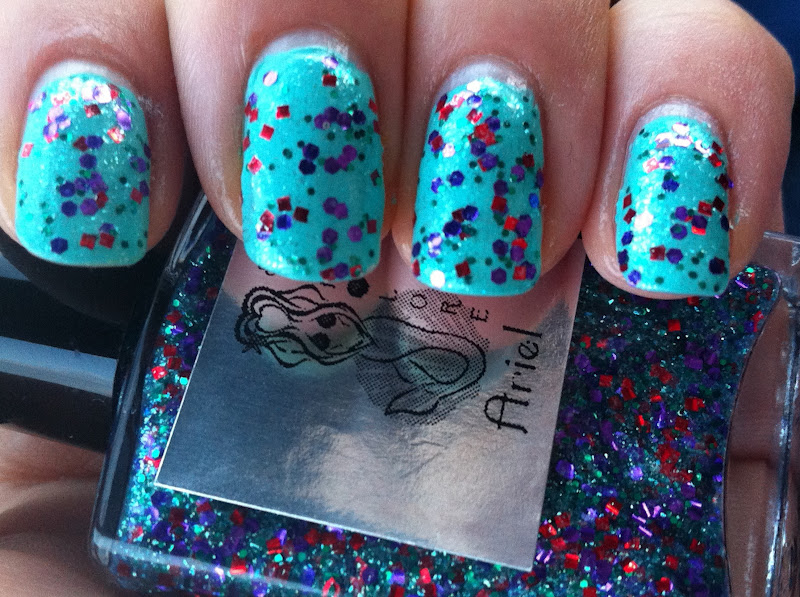
Sea Lore's Ariel layered over China Glaze's Aquadelic.


Sea Lore is an indie polish company, headed by Jamie Lohr. There is only seven polishes by Sea Lore at the moment, forming the King Triton's Daughters collection. I wanted all seven polishes, but my bank account simply wouldn't stretch that far, so I picked Ariel. 'Cos y'know, The Little Mermaid was all about Ariel. Man alive, I loved that film! I can remember owning it on VHS and everything. I even wished I had long red hair exactly like Ariel's..

Anyway, childhood reminsicing aside, Ariel polish is a light aqua green jelly with small glass fleck shimmer. It has small circular green glitter, purple hexagonal glitter, and red square glitter. Thats a whole lotta glitter. I wanted to give the glitter a punchy base, so I picked my favourite China Glaze polish, Aquadelic as Ariel's base. They work really well together, as you can see!

And on a separate note, today was a very special day, as my little daughter had her first birthday! Today has been non-stop packed with fun, presents, balloons and cake, but now my sugar high is wearing off, and I'm writing this post with just one eye open. As a parting note, here is a picture of the birthday girl!

 
What a cutie pie!
(Outfit from Next)

Sunday, 16 September 2012

31 Day Challenge: Day 15- Delicate Print

Hey guys!

Woohoo! We're now halfway through the challenge! Today's challenge was Delicate Print nails. In my mind, a really delicate nail art pattern requires stamping of some form. However, because I have no stamps in my nail art collection (yet!), I set about a simple, delicate print with some striping tape and my trusty Rio Beauty nail art pens!

 
Bourjois 1 Seconde in Shade 50 Bleu


Now, you will have to excuse the knock on the index finger! I bashed my hand at work, and trust me, the nail looked a lot worse initially! I managed to patch it up a little, but I didn't have enough time to restart the whole nail! You may notice my accent nail looks like its bulging- it is. With topcoat, to seal the striping tape in! As great as striping tape looks in the beginning, it can peel off the nail and go astray. So I just glued the little sucker back down!!

The Bourjois polish is a previously unused polish, and I just adore it. I love the colour, and I love how these One Second nail varnishes apply. But more on that later, as I have a bit of a Bourjois special post in the pipe line!

Friday, 14 September 2012

31 Day Challenge: Day 14- Floral Nails

Hey guys!

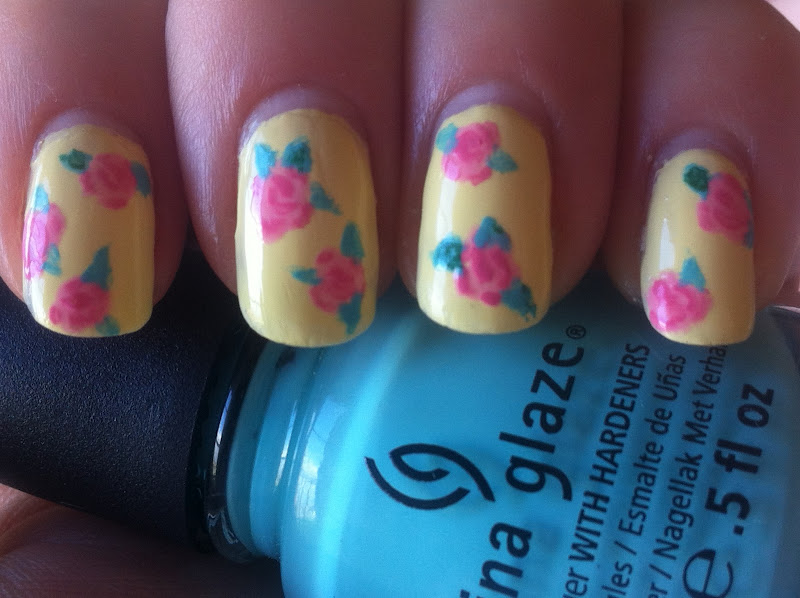
Now, I have never done floral nail art before. I mean, where do you start? A sunflower? Daisy? Hydrangea? (lol) So, I thought about what I wanted to do, and as I was cooking dinner one night, I glimpsed some of my Cath Kidston crockery. Hence this cute little rose design:-

 
Cute or what?!?


I really, really liked how this mani turned out. I think its by far my best work yet! I shall be re-visiting this pattern again soon, and may throw some polka dots into the mix. Or better yet, a whole Cath Kidston inspired mani with a different print for each nail!

Here's a rundown on the polishes I used:-

BASE COLOUR: Nails Inc Sumner Place
ROSE PETALS: Nails Inc Regents Park and Warwick Avenue
ROSE LEAVES: China Glaze Aquadelic and Rio Beauty Green nail art pen.

I can't wait to see what everyone else comes up with for today's challenge!!

Tuesday, 11 September 2012

31 Day Challenge: Day 11- Polka Dots

Hey guys!

Sorry for missing yesterday's challenge! I will make it up to you and do a gradient mani at some point in the near future. Today's challenge however, is Polka Dots and it just so happens that I recently bought a set of dotting tools!

 
Q. Which Disney character inpired this mani?

 
Minnie Mouse!
 
 
I loved using my new set of dotting tools! Ah, I am going to have endless amounts of fun using them. I always think that Polka Dot manis are simple, but still striking and effective. They are also easy to master for beginners in nail art.
 
I really must apologise for the quality of pictures today- they have been taken under artificial light. The nights are drawing in here in the UK which can only mean one thing- Fall is a'comin'!! :)

Sunday, 9 September 2012

31 Day Challenge: Day 9- Rainbow Nails

Sorry for the late publication of this post, but as the saying goes, better late than never! Let's hop right into today's challenge:-

 
How cute is this?!?!


I just love the silver glitter 'raindrops!'


Under artificial light.
 
I had great fun doing this mani, even if I was shattered from doing a busy 6am-3pm shift at work! I just kinda made the design up as I went along, and it was one of the instances where my gut instinct came up trumps!
 
Here's what I used:-
 
BASE: Chanel Le Vernis in Coco Blue
RAINDROPS: No7 Glitter Top Coat in Silver
RAINBOW AND CLOUDS: Rio Nail Art Pens
GLITTER SUN: Models Own in Hed Kandi Disco Heaven
 
The Model's Own polish was untried- I had to crack the cellophane off another polish! Tomorrow's challenge is Gradient Nails. I've never attempted these before so it should be rather interesting!!


Saturday, 8 September 2012

31 Day Challenge: Day 8- Metallic Nails

Hey guys!

So the Metallic nails challenge had me scratching my head. What could I do? What untried nail polish could I incorporate? What nail art should I attempt? Then, the idea came to come one night. I think I even wrote it down. Here is the fruition of my idea:-


Boom!
 
What would be better and more metallic-y than metallic foil nail wraps!? Not to mention quicker than painting nails in lacquer and waiting for them to dry. What's more, the Nail Rock wraps were an abosolute bargain:-
 
 
50p!!
 
Yes, you are seeing right! I was in New Look the other day looking at the W7 nail polish slection (they didn't have much, and certainly not the ones I wanted), but they did have a massive selection of nail wraps for fifty pence. The majority of the selection was Giles for New Look, but I found these Nail Rock wraps lurking somewhere at the back.
 
Now this is only the second time in my 27 years that I have tried nail wraps, and my first time was only the other week! I must say that although there are lumps and ridges in the wraps in this mani, it is nothing compared to my first attempt! These tricky little suckers get easier with practise.


I can't wait to try more nail wraps. They seem a great way to get a detailed manicure without all the hassle. Yeah, I know its technically cheating, but ocasionally when time is in short supply, these are ideal. I have my eye on some Models Own nail wraps and some exotic print Nail Rock wraps. Ooo, and I may just have to hunt down the Meadham Kirchoff Nail Rock wraps that Topshop were selling earlier this year. Stay tuned! 


Friday, 7 September 2012

31 Day Challenge: Day 7- Black & White

Hey guys!

I have seriously been looking forward to today's challenge! I personally think black and white on nails looks uh-mazing! I also bought the most beautiful black nail varnish the other night- have a little look:-


Illamasqua nail varnish in Creator.


Creator is a black jelly base in which irregular shaped silver glitter is suspended. It looks good at two coats, however it looks great with three, which is what you see here. Its quite a runny nail varnish, so be sure to apply a small amount on the nail to work with so it doesn't end up pooling in your cuticles.
 
Despite it being a glitter polish, Creator dries smooth. Drying time is also pretty quick with Creator.


Above picture: Creator in direct sunlight.


I love how the glitter is not uniform in Creator-
you can especially see this in the bottle.


So on my ring finger I did a little taping experiment! I have never tried a taping mani before, so I thought I'd keep it simple with stripes. I painted my nail in Barry M Nail Paint in Matte White and let it completely dry. I then cut some scotch tape into thin strips. I placed these strips onto my skin first, to take away some of the 'stick' so that when I placed them onto my nails, they didn't pull away the white paint. I then painted Creator on the places where there wasn't tape. When Creator was still tacky (but not wet), I gently prised away the tape. I then painted a border around my nails using Creator and a nail art pen.
 
Once everything was completely dry, I applied a glossy top coat. I then applied six diamantes, using top coat as an adhesive and a fine nail brush to apply them. Here's an obligatory close up shot:-