Friday 31 August 2012

L'Oreal Chrome Intensity Eyeshadow - Eye Look and Review

Hey guys!

Here is a look I did this week with a L'Oreal Chrome Intensity eyeshadow in Blue Jeans. This shadow had been catching my eye in the shops for a while because of it's deep, royal blue colour and shimmer.

 
Blue Jeans.
 
 
Without flash.

 
With flash. Damn chrome effect packaging- almost blinding!


Ooo. Look at that shimmer. Beautiful!


This look was super easy to create. I started by tracing a faint line above my socket crease using a blue eyeliner. I then used a dampened MAC 272 brush (sadly now discontinued) to pack the eyeshadow colour within the traced line, and blended it into and above the line, to avoid a harsh 'sketched-on' look.
 
I then wanted to give this gorgeous blue, what I consider to be an 'imperial' look -I think I'd been reading about Russian tsars! So, I lined my upper lid with a 17 Cosmetics Starry Eyes Liquid Eye Liner in Stardust, a dense gold glitter liner. These eyeliners are da BOMB! Seriously, for less than £4, you can pick these up, and in they're just as good as the Urban Decay or Too Faced glitter liners. They apply well, with a good amount of glitter, and they don't feel gritty or irritable on my skin. Result.
 
The eyeshadow is an awesome colour, however the pigment is seriously lacking. I originally attempted to apply Blue Jeans with a dry brush, but soon gave that up as a bad job! The sponge applicator that come in the case is also pointless- it just didn't deposit enough shadow and it looked washed out. However with a damp brush, and some perserverance in packing the shadow on,  the result is pretty good! I also found it easily blendable, especially when my 272 brush had dried after packing the colour on. I just wish that L'Oreal did this colour in it's Color Infallible range, because the formula and pigment on those shadows ROCKS.
 
Starry Eyes Glitter Eyeliners are £3.99 and are available exclusively in Boots stores or on boots.com
 
L'Oreal Chrome Intensity Eyeshadows are around £6, and are available from Boots or Superdrug.


Thursday 30 August 2012

Freebie Alert! 17 Cosmetics Get Bronzed Kit

Everyone loves a good freebie, myself included. At the moment, 17 Cosmetics (a Boots exclusive brand) are offered a free 'Get Bronzed' kit, when you spend £5.99 or more on the brand's products. Easy done, right? In fact, I only had to buy one product, an Instant Glow bronzer, and the kit was on it's way home with me!


Get Bronzed Kit
 
 
Considering this is a freebie when you purchase under £6 worth of product, I'd say this is a pretty good freebie! Inside you get Statuesque, a metallic nude eyeshadow; In The Nude, a roasted caramel colour lipgloss, and Bronzed, a shimmery bronze cream blush. The cream blush in this kit is limited edition, but the eyeshadow and lipgloss are permanent products in the 17 Cosmetics range.
 
 
Inside the kit.
 
 
Statuesque eyeshadow.
 
 
In the Nude Lipgloss.
 
 
Bronzed Cream Blush.
 
 
Swatches l-r: In the Nude, Statuesque, Bronzed.
 
The colours in this kit are totally wearable, and would be great on their own for a daytime look. The Statuesque eyeshadow would go great with a dark brown eyeshadow to create a smokey eye for a nighttime look. The only product in this kit that I'm not entirely convinced with is the cream blusher. It wouldn't be enough on its own for me- its too sheer. However, blended on to the apples with a deeper bronzer as a contour- now that would work!
 
The kit is available in Boots stores and is free when you spend £5.99 or more on 17 Cosmetics. The kit is available until the 4th September 2012, so you better hurry!!


Wednesday 29 August 2012

Lash Love #1: MAC 34 Lash

Hey everyone!

Its probably no secret to you all that I am a serious lash-a-holic. Seriously, I love them. Even when I take them off, forget where I put them, then get the bejeesus scared outta me when I find them and think they're spiders!

My MAC lashes however, I treat with a bit more respect. Especially considering they come in such a neat little case, making it hella lot easier to care and maintain them properly. The 34 lash is the most recent addition to my lash collection, and they are simply beautiful:

 
MAC 34 Lash
 
MAC describes these on their website as "dramatically long. Wispy. Features a long, wing-cornered edge." I totally agree! However, on their website, they omit to mention that some of the lash strands in the strip are actually BROWN. Ooo, I've never tried brown or at least part-brown lashes before. As always, I try everything with an open mind! I'm glad I do, because look at the lashes on...


Brown strands are visible in this close up shot.
 
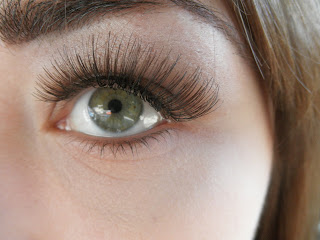
How super flattering are these? I wanted to keep the eyes neutral so that you can see the lashes clearly, without any loud make up detracting from them! In these pictures I am wearing some shades from my trusty naked palette (Buck and Naked, I think) and these lashes perfectly complement this natural, day time look.
 
With regards to application, the 34 lash was exceptionally easy to apply, due to it being lightweight and the strip being flexible. I used my usual DUO adhesive to apply them. These lashes were also a good size, and I didn't need to trim them. Thanks to the wispiness of these lashes, they were also comfortable to wear. You know the heavy feeling you get about halfway through the day, when all you want to do is rip your lashes off, and William Wallace stylee, scream 'FREEDOM!!' Yeah, I didn't get that with the 34 lash.
 
I would say that the 34 lash is great for a daytime look, to add some oomph to your own lashes. The flipside of this is, that if you want to achieve a more dramatic eye look, then you should probably choose a completely black lash. I would certainly recommend these to false lash newbies, thanks to ease of application and wear.
 
The 34 lash is £10.00 and is available at MAC counters and online MAC.
 
More lash love coming soon!


Friday 24 August 2012

NOTD: Barry M Foil Special Effects- Part 2

So here is my second and concluding part of the posts covering the Barry M trio of Foil Special Effects Nail Paints. Today's nail post is Lilac Foil, which is also a limited edition nail paint. (The gold and silver foils, I assume to be permanent).


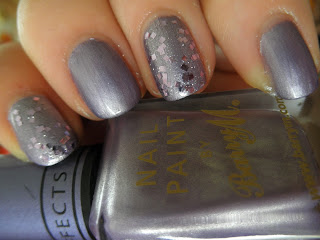
Barry M Lilac Foil with Lavender glitter top coat.


Close up shot.
 
For some reason, the Lilac Foil applies better than the Gold and Silver foil nail paints. The formula doesn't seem as streaky. That said, it maybe isn't as foil-like as the other two paints, as this seems to have a very fine silver shimmer to it. You can see this in the close up shot.
 
The Lavender top coat is a clear base with micro fine silver glitter and lilac coloured square glitter particles. I absolutely freakin' love it. It looks great layered over black, but now that I've layered it over the Lilac Foil, this may now be my favourite combo with it! I didn't want it on all of my nails though- I still wanted to be able to see the beautiful foil paint. <3
 
Have you guys tried either of these? What is your favourite glitter polish of all time?


50 Shades of Birthday Party!

...no, its not me that's 50, its my mum. Last Saturday she reached the landmark of half a century young, and my family and me threw her a party to celebrate in style!

Of course, there was no way I was celebrating without my nails painted! However, just lately my nails have been in absolutely shocking condition, so I decided that for this special occasion, I would apply some stick-on nails (which normally I try to steer clear of), and paint them in something sparkly!


No 7 Stay Perfect Glitter Top Coat in Gold
layered over Barry M Special Effects in Gold Foil.


So what do you guys think? Personally I was really impressed with the stick on nails. I used Broadway Real Life Nails in the Short length, and with the exception of the nail on my middle finger which looks kinda bulky, all the other nails look rather natural! Impressed. The nails were also really easy to apply, as they had numbered tabs which could then be snapped off once the false nail had dried to you nail. Simple, and less mess. Thumbs up from me!
 
I absolutely adored the polish combo. Gold foil effect and glitter? Yes and yes. 'Nuff said.
 
I also decided to make a cake for my mum. Although I'm not so confident in my cake making skills that I wanted this to be her main birthday cake, I certainly wanted to create something extra special.
 

My mum's birthday cake!


By the way, the cake was delicious! Sponge with buttercream and raspberry jam. It was awesome with a cuppa!

And, here's some snaps of me and the Birthday Girl herself. Don't you think we look alike?


Me and Mum are rocking dresses from Dorothy Perkins.
Chloe's dress is from Primark.


Just thought I'd show off a cute pic of my daughter!
 
So, how have you guys been? x

Tuesday 14 August 2012

NOTD: Barry M Foil Special Effects - Part 1

It seems to me that Barry M are the authority on special nail effects, particularly so in the high street cosmetics sector. While their most recent additions to the Special Effects range include the Magnetics and the Chameleons, I want to show you a manicure I did with the Foil Special Effects nail paints that were released last year.


I used Nail Paint in Gold Foil on all my nails apart from my ring finger, on which I used Silver Foil as an accent. I then stuck some diamontes on using a clear top coat. I didn't cover the full nail in these because I still wanted to show just how beautiful the nail paint is! The nail paints applied smoothly, however I would advise to take your time with these and apply thin coats, as they bubble easily. Also, try to use an even applying motion, otherwise you will end up with brushstrokes!


Have you guys tried these Nail Paints? What's your favourite Barry M Nail Paint of all time? 

Monday 13 August 2012

MAC Electric Cool Eyeshadow

MAC have recently released a collection of eyeshadows that have the most unusual texture! The Electric Cool range has a consistency that is somewhere between a foam and a gel. Not dissimilar to L'Oreal's Color Infallible eyeshadows, but slightly more moist. Kinda bouncy. There were 12 different colours in the range and I plumped for Fashion Circuit, a bright shimmery teal green colour.


Without flash


With Flash


To show just how bright and shimmery Fashion Circuit is, I took some pictures in direct sunlight.


Other products I used are: Urban Decay Primer Potion in Eden, Urban Decay 24:7 eyeliner pencil in Zero, Benefit Magic Ink Liquid Liner, and two shades from Urban Decay's Naked Palette (the first palette) in Virgin and Creep. My lashes are some Girls Aloud Festival Lashes that I've had for a while but not used. Brows are done with Benefit Browzings in Medium.

I really enjoyed using this shadow, the texture is out of this world and is loaded with pigment. I have read some reviews in which other bloggers have found the more neutral Electric Cool shades to be quite poor in pigment, but Fashion Circuit was nice and bold. I think the way these shadows are applied make all the difference: try packing the colour on with a stiff bristled brush as opposed to a fluff brush, and use in a patting motion, as opposed to sweeping the colour on.

Have you tried the Electric Cool shadows? Are you loving or leaving them?