Showing posts with label Nail Art. Show all posts

Monday, 11 February 2013

Calendar Nails!- Chinese New Year

Happy Year of the Snake!

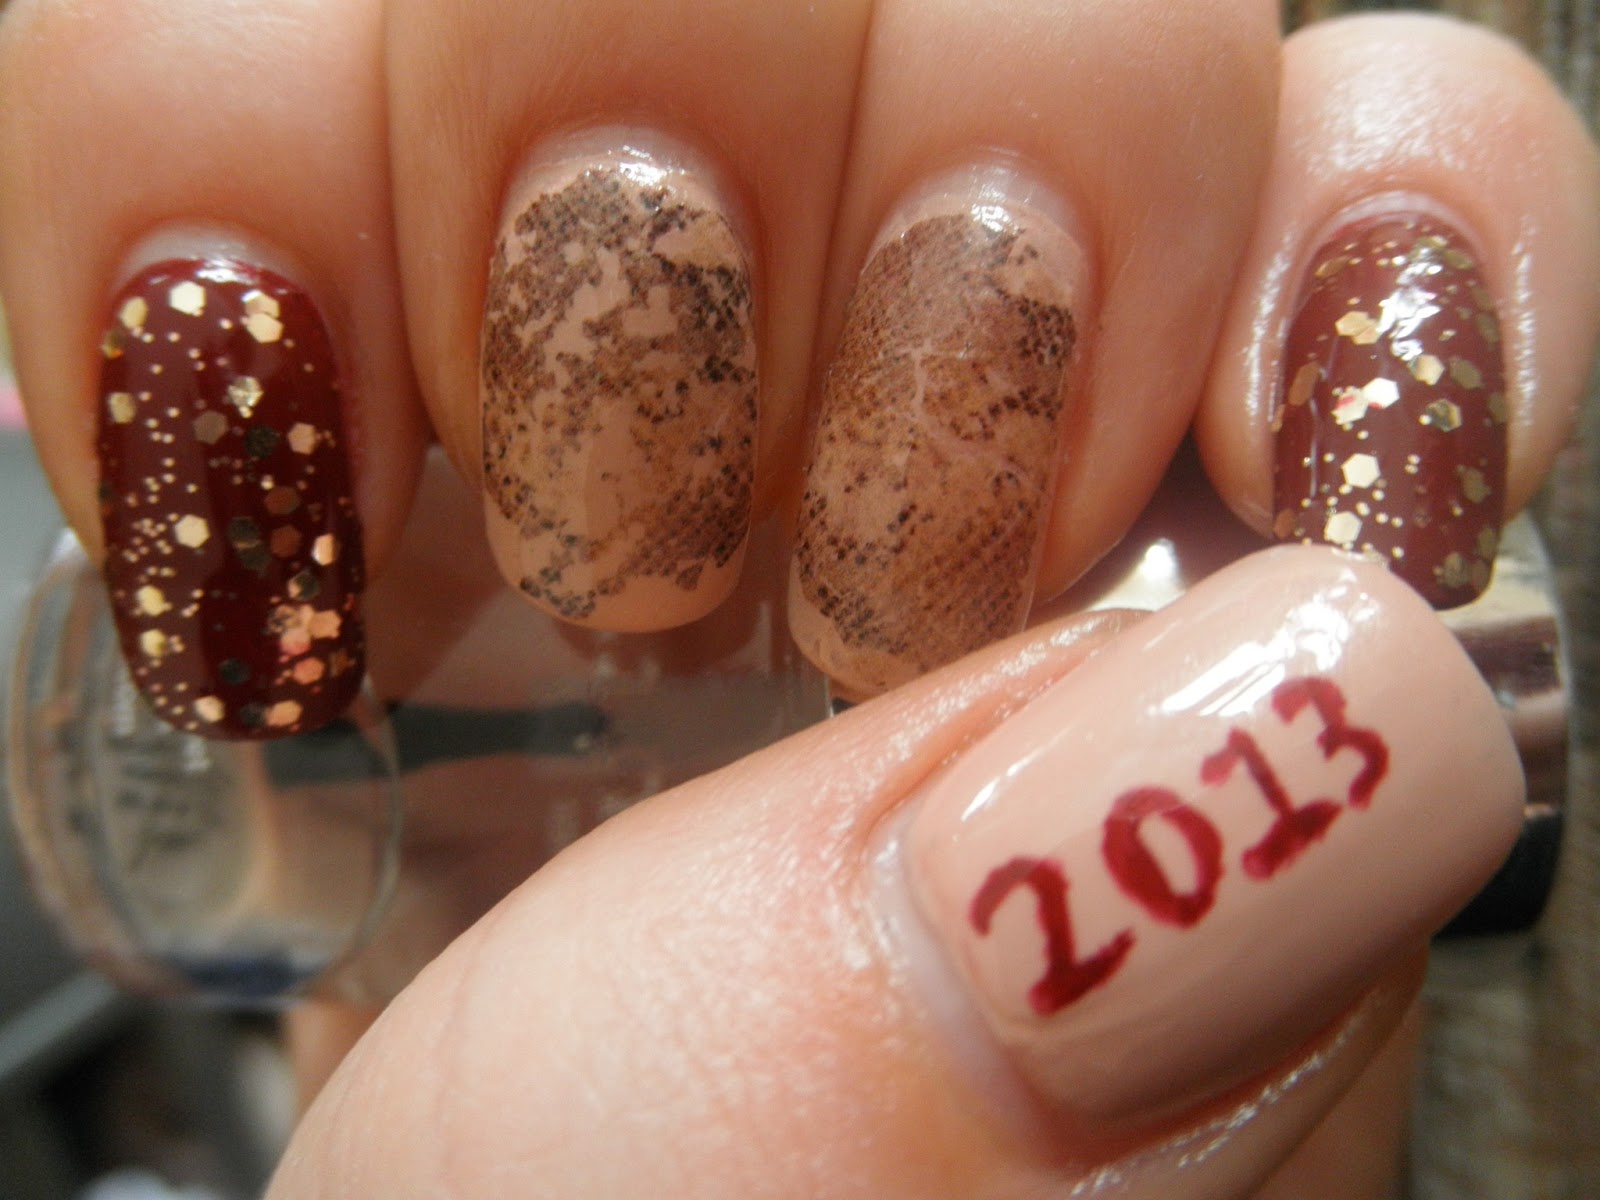
For my Chinese New Year mani, I needed one thing and one thing only:- SNAKE PRINT!

I must admit, the skill level required to do this mani was pretty low. I used some snake print water decals that I ordered off ebay for my middle and ring finger. They are layered over MAC's Hangin' Loose to make the snake print stand out better. On my index finger I have layered a No7 Glitter top coat over MAC's Dangerously Fun. On my thumb is Hangin' Loose again, with '2013' drawn with Dangerously Fun. Both MAC polishes are from the Apres Chic collection.


I love the red with gold glitter combo!


FUN FACT: I was born in 1984, a Year of the Rat. Apparently traits of people born in a Year of the Rat are smart, but also selfish. Hmn.

Next calendar nails: Valentine's Day on February 14th!


Saturday, 26 January 2013

Calendar Nails! - Burns Night

Hey guys!

Ready for some seasonal nail art?!? I am! In a bid to improve my nail art skills, I shall be creating manicures based on calendar holidays, as and when they occur this year. The first one up this year is Burns Night. 

Burns Night is a celebration of the life and poetry Scotsman poet Robert Burns. This event is celebrated on the anniversary of his birthday, the 25th of January. Traditionally, a Burns night supper would include a meal of haggis, neeps and tatties. Yum.

For my take on Burns Night nail art, I opted for a tartan print:-


I used MAC Shirelle for the red base color, then I used my Rio Beauty striping pens to do the green and blue stripes. I really wanted to use my gold nail art pen for the dots (to imitate threads), but it was paying hide and seek, so I used my yellow pen instead. My nail art pens are getting kinda lumpy now, its maybe time to invest in some new ones!

I want to do this tartan mani again, but next time, I want to do a pastel tartan print. The new Butter London collection is something I particularly have my eye on!!

FUN FACT! Haggis isn't a real animal. The truth is far worse. It is a meal consisting of sheep's heart, liver and lungs (known as pluck) minced with onion, suet and spices, which is then encased in sheep's stomach and simmered for hours. Ooh err.

Next Calendar Nails!:- 10th February: Chinese New Year. 

Sunday, 16 September 2012

31 Day Challenge: Day 15- Delicate Print

Hey guys!

Woohoo! We're now halfway through the challenge! Today's challenge was Delicate Print nails. In my mind, a really delicate nail art pattern requires stamping of some form. However, because I have no stamps in my nail art collection (yet!), I set about a simple, delicate print with some striping tape and my trusty Rio Beauty nail art pens!

 
Bourjois 1 Seconde in Shade 50 Bleu


Now, you will have to excuse the knock on the index finger! I bashed my hand at work, and trust me, the nail looked a lot worse initially! I managed to patch it up a little, but I didn't have enough time to restart the whole nail! You may notice my accent nail looks like its bulging- it is. With topcoat, to seal the striping tape in! As great as striping tape looks in the beginning, it can peel off the nail and go astray. So I just glued the little sucker back down!!

The Bourjois polish is a previously unused polish, and I just adore it. I love the colour, and I love how these One Second nail varnishes apply. But more on that later, as I have a bit of a Bourjois special post in the pipe line!

Friday, 14 September 2012

31 Day Challenge: Day 14- Floral Nails

Hey guys!

Now, I have never done floral nail art before. I mean, where do you start? A sunflower? Daisy? Hydrangea? (lol) So, I thought about what I wanted to do, and as I was cooking dinner one night, I glimpsed some of my Cath Kidston crockery. Hence this cute little rose design:-

 
Cute or what?!?


I really, really liked how this mani turned out. I think its by far my best work yet! I shall be re-visiting this pattern again soon, and may throw some polka dots into the mix. Or better yet, a whole Cath Kidston inspired mani with a different print for each nail!

Here's a rundown on the polishes I used:-

BASE COLOUR: Nails Inc Sumner Place
ROSE PETALS: Nails Inc Regents Park and Warwick Avenue
ROSE LEAVES: China Glaze Aquadelic and Rio Beauty Green nail art pen.

I can't wait to see what everyone else comes up with for today's challenge!!

Tuesday, 11 September 2012

31 Day Challenge: Day 11- Polka Dots

Hey guys!

Sorry for missing yesterday's challenge! I will make it up to you and do a gradient mani at some point in the near future. Today's challenge however, is Polka Dots and it just so happens that I recently bought a set of dotting tools!

 
Q. Which Disney character inpired this mani?

 
Minnie Mouse!
 
 
I loved using my new set of dotting tools! Ah, I am going to have endless amounts of fun using them. I always think that Polka Dot manis are simple, but still striking and effective. They are also easy to master for beginners in nail art.
 
I really must apologise for the quality of pictures today- they have been taken under artificial light. The nights are drawing in here in the UK which can only mean one thing- Fall is a'comin'!! :)

Sunday, 9 September 2012

31 Day Challenge: Day 9- Rainbow Nails

Sorry for the late publication of this post, but as the saying goes, better late than never! Let's hop right into today's challenge:-

 
How cute is this?!?!


I just love the silver glitter 'raindrops!'


Under artificial light.
 
I had great fun doing this mani, even if I was shattered from doing a busy 6am-3pm shift at work! I just kinda made the design up as I went along, and it was one of the instances where my gut instinct came up trumps!
 
Here's what I used:-
 
BASE: Chanel Le Vernis in Coco Blue
RAINDROPS: No7 Glitter Top Coat in Silver
RAINBOW AND CLOUDS: Rio Nail Art Pens
GLITTER SUN: Models Own in Hed Kandi Disco Heaven
 
The Model's Own polish was untried- I had to crack the cellophane off another polish! Tomorrow's challenge is Gradient Nails. I've never attempted these before so it should be rather interesting!!


Friday, 7 September 2012

31 Day Challenge: Day 7- Black & White

Hey guys!

I have seriously been looking forward to today's challenge! I personally think black and white on nails looks uh-mazing! I also bought the most beautiful black nail varnish the other night- have a little look:-


Illamasqua nail varnish in Creator.


Creator is a black jelly base in which irregular shaped silver glitter is suspended. It looks good at two coats, however it looks great with three, which is what you see here. Its quite a runny nail varnish, so be sure to apply a small amount on the nail to work with so it doesn't end up pooling in your cuticles.
 
Despite it being a glitter polish, Creator dries smooth. Drying time is also pretty quick with Creator.


Above picture: Creator in direct sunlight.


I love how the glitter is not uniform in Creator-
you can especially see this in the bottle.


So on my ring finger I did a little taping experiment! I have never tried a taping mani before, so I thought I'd keep it simple with stripes. I painted my nail in Barry M Nail Paint in Matte White and let it completely dry. I then cut some scotch tape into thin strips. I placed these strips onto my skin first, to take away some of the 'stick' so that when I placed them onto my nails, they didn't pull away the white paint. I then painted Creator on the places where there wasn't tape. When Creator was still tacky (but not wet), I gently prised away the tape. I then painted a border around my nails using Creator and a nail art pen.
 
Once everything was completely dry, I applied a glossy top coat. I then applied six diamantes, using top coat as an adhesive and a fine nail brush to apply them. Here's an obligatory close up shot:-


Tuesday, 4 September 2012

31 Day Challenge: Day Four- Green

Hey guys!

Today's colour was green! Personally, I LOVE green nail varnish and I have a fair few greens in my collection. However, since the emphasis of the 31 day challenge is untried nail varnishes, I had to use this little lovely:


MAC Salad Dressed.


Close up shot.
 
APOLOGIES!! For the smudge on the pinky finger! As I was taking pictures of my mani, my soon to be one year old daughter thought it would be a GREAT idea to whack the camera down on to my still wet nails. Aboo. 


Smudges aside, I liked how this turned out. Salad Dressed is a mid-green creme varnish that leans toward a teal shade. Application was smooth and problem free. I also decided to do some simple nail art, just to jazz the mani up a bit- I didn't want you guys to just see a plain creme mani. *snoooooze*

So yeah, sorry for the smudge! Tomorrow's challenge is purple, and I have a new pretty polish just waiting to be tried!

Friday, 1 June 2012

Another 99p manicure!

Remember the star spangled manicure that I did here? Well, I was in my local branch of discount bookstore The Works and was rummaging around the crafts section when I find these:-


Wiggle eyes! Or Goggly Eyes, which is what I know them as1 I used to make silly greetings cards with these stuck on them when I was in primary school! Fast forward 21 years and I still have a use for these little suckers...


My Monster Mani!


Here are the varnishes that I used: Pinky finger - No 7 Stay Perfect Poolside Blue, Ring finger- OPI Did It On 'Em, Middle finger- Rimmel 60 Seconds Blue My Mind, Index finger- Ciate Paint Pot Jelly Bean.


I don't know why my pinky looks so solemn! 


Monsters Inc was the inspiration behing my ring finger.


What'ya lookin' at?

Needless to say, this was the easiest mani to do! A lick of paint, and then a tiny bit of nail glue to fix the eyes down! I used the Models Own nail art pens to add the details. Simples!

There was also a pack of wiggle eyes with eyelashes available at The Works so keep your googly eyes on my page to see them soon!

Monday, 23 April 2012

Saint George's Day mani

Happy Saint George's Day everybody! I created this super simple mani using Barry M nail paints and a Rio Beauty nail art pen.


On the ring finger I used Barry M nail paint in Matt White. Once thoroughly dry, I then used the Rio nail art pen to draw a simple cross. I then used Barry M nail paint in Red Glitter to make it 'pop'. On all my other nails is Nails Inc in Milan, topped with just one coat of the Barry M Red Glitter. I love the glitter varnishes by Barry M, they apply really well and are packed with sparkle.


In direct sunlight to show just how sparkly this Barry M
 nail paint really is!

Non-direct sunlight. I just love this nail paint!